Currently running on the latest FreeNAS 9.10-STABLE, I installed the MineOS plugin and have been able to setup and run vanilla 1.12 servers, allow them to be externally accessible from my network, etc.
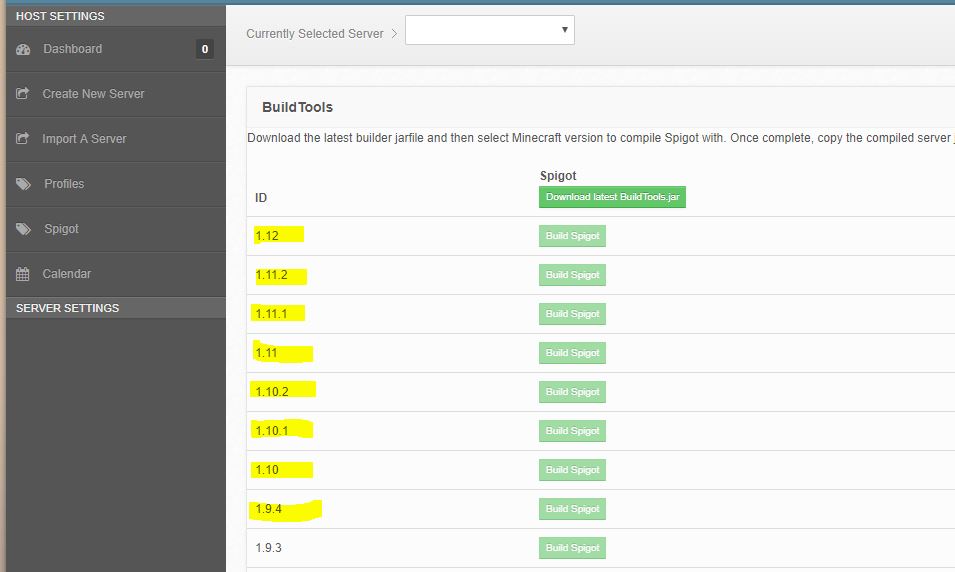
I now want to setup a server using spigot for 1.12, however when I go to build the jar for it there simply isn’t an option (see image below). About a year ago I ran a Craftbukkit server on FreeNAS 9.3/MC 1.10.2 but even 1.10.2 is missing from the list. Anyone else run into this/figure out how to get the latest spigot/craftbukkit jars to pop up? And in the case that I can’t do this through the webui, how can I do it manually from the jail?
When I google “spigot vs craftbukkit” I get this result:
CraftBukkit is a modified vanilla minecraft server with the Bukkit API built into it.
Spigot is a modified craftbukkit server to improve performance, which also extends the Bukkit API a bit.
For that reason, only Spigot (should) be listed now. Since your screenshot still shows Craftbukkit in the webui, it indicates you haven’t updated your webui in a while.
But then I see, you’re also on FreeNAS, which means that your webui version lags behind the current latest updates… (I don’t maintain the FreeBSD plugin, Josh4Trunks does).
Up in the top right corner, click your username and click the “refresh profiles”. Even back then, doing this should help make newer versions show up. If not, we really want to get that plugin updated, because some fairly substantial changes have happened since your version that has really helped performance and usability.
@hexparrot thanks for the response. I ended up getting it working, albeit in an odd manner. Like you mentioned, since I’m on FreeNAS, the “updating your ui” section is doesn’t help as none of those directories exist on FreeBSD (ie there is no /usr/games/minecraft directory). The refresh profiles button does just that- it refreshes the profile list section, but as far as I can tell, it has no effect on the Spigot/Craftbukkit section.
So here’s the solution:
Read my post below, i’ve done a full write-up on the process from scratch!
Just for future clarity sake (I know I’m gonna need to make a new server in a year or two and will have forgotten all of this), here’s a full writeup from scratch. (Since I’m a new user and can only put 5 links in a post anywhere that has (H) below signifies http:// and (HS) signifies https://
Abstract:
Using FreeNAS and MineOS to configure a Spigot/Craftbukkit (from here on referred to as S/C) server with support for users outside the network to play and using the plugin Dynmap. Works for any version of S/C even if these aren’t listed for you in the WebUI. While this should work for both, in particular I’m setting up a Spigot server here. If you’re setting up an S/C server and the version you want IS displayed in the S/C section of the WebUI, you can try this approach ut it is recommended to do it the traditional way outlined here: (H)forums.freenas.org/index.php?threads/freenas-9-plugin-mineos.20122
Prereqs:
Server: FreeNAS-9.10-STABLE
OS used to access WebUI’s: Windows 10
Assumptions:
Router: 192.168.0.1
FreeNAS server is at 192.168.0.110 on the local network
The Minecraft server is at 192.168.0.190 on the local network (need to specify this for other users to access the server externally)
Latest/target minecraft version: 1.12
NOTE: I will be using the three addresses above for my Router/FreeNAS/MineOS- yours will probably be different (at the last two). Sub out my addresses for yours where applicable.
Part 1: Installing MineOS
Hop into the FreeNAS WebUI and navigate to plugins, install MineOS. This will create and start the jail but the plugin will be off
Go to jails and change the ipv4 address of the jail from the default (in my case 192.168.1.1), to whatever you want it to be within your router’s DHCP range (in my case 192.168.0.190)
Go to the Tasks > Init/Shutdown Scripts section of the FreeNAS WebUI and add a script with the following properties:
Type: Command
Command: mount -t linprocfs linprocfs /mnt/roots/jails/mineos_1/usr/compat/linux/proc
When: Post Init
Reboot the server and log back in
Go to installed plugins and turn the plugin on (you may need to turn it back on after each reboot)
Go to the MineOS WebUI at (HS)192.168.0.190:8443 (Note here that it uses SSL so the https is necessary. If you go through chrome it may give you a safety warning, just click Advanced and Proceed to…)
Login, use the default mcserver/mcserver and make sure you can access the WebUI
Part 2: Creating/Configuring the Server
(Spigot instructions pulled from here (HS)spigotmc.org/wiki/buildtools))
Create a new server with whatever properties you want, but be sure to specify 25565 for the port and 192.168.0.190 for the ip address
If you just want a S/C server with the latest version of minecraft, go to the S/C section and click the Download latest BuildTools button. If you want a version that isn’t the latest and isn’t displayed in the MineOS WebUI, skip this part.
Either use jexec or open the jail’s shell from the FreeNAS WebUI
Run the following to get the jail up to date:
pkg update
pkg upgrade
Install git and Java 8, which is needed for all version of minecraft >= 1.12 (even if you’re doing, say, 1.10.2, install Java 8)
pkg install git
pkg install openjdk8
(only if you’re not doing the latest version) make sure wget is installed and download the version of S/C you want, make a directory for it and place it inside, compile it (compiling will take some time)
pkg install wget
cd /var/games/minecraft
mkdir BuildTools-whatever-version-you-chose
cd BuildTools-whatever-version-you-chose
wget -O BuildTools.jar https://hub.spigotmc.org/jenkins/job/BuildTools/lastSuccessfulBuild/artifact/target/BuildTools.jar
git config --global --unset core.autocrlf
java -jar BuildTools.jar --rev whatever-version-you-chose
(only if you’re using the latest version) go to the latest BuildTools you downloaded earlier and compile it (compiling will take some time)
cd /var/games/minecraft/BuildTools-latest
git config --global --unset core.autocrlf
java -jar BuildTools.jar
With the BuildTools compiled, go back to the MineOS WebUI and go to the server status page. Select BuildTools-latest for the profile and change the runnable jar to either spigot or craftbukkit, whichever you prefer
Up the maximum memory to something like 1024 or 2048 and enable Start server on boot
Click Accept EULA, accept the EULA, wait a couple seconds, then hit the Start button next to it. After a few more seconds the server should start up. Verify there weren’t any issues by checking the logs on the WebUI
Part 3: Server Connectivity, Adjusting Properties, Adding Plugins
Now open minecraft and add the server to the list, specifying 192.168.0.190:25565 as the address. Join in and make sure you can connect.
Now make sure you can connect externally. To do this, you need some sort of dynamic dns service pointing at your FreeNAS server. There are posts on this at the FreeNAS forums, but in my case I use duckdns. Go into your router and find the section to configure port forwarding. Pick a port in the higher 30000 - 50000 numbers and forward that to the 192.168.0.190 address/25565 port that the MineOS server is running on. Thus the address you can give other people off your network for the server would be your-duckdns-name.duckdns.org:45565 (assuming you picked 45565 as your external port number). To verify this works as well add the server to your minecraft server list with this address instead of the local one and connect through it.
Disconnect from the server and go back to the MineOS WebUI. Go to the server properties section to change any of the pre-filled properties. If you want to add/remove properties in an (arguably) easier manner than using the WebUI, download WinSCP and connect to your server through SFTP (this will require the SSH service in FreeNAS to be enabled and configured). This isn’t required since you can navigate to files/edit them through the FreeNAS shell and download files using wget, but it makes it easier.
NOTE: Any files you create within your server’s directory (ie /var/games/minecraft/servers/Your-saerver-here/) need to have the user and group 199 (the mc user/group) otherwise issues will occur. WinSCP makes it easy to both edit these files and change their owner/group, but it will probably make new files as root/root by default so you’ll need to fix that
To add a whitelist, enable the whitelist property in the server.properties file and use a site like this: https://mcuuid.net/ to generate UUID’s from your server-member’s names. You can lookup the format online for how to write the json file out
Follow a similar procedure for adding users to the OP list, though look online for the exact format
To install plugins, you’ll typically need to go into the server’s plugins directory and then follow their instructions. For Dynmap ((HS)spigotmc.org/resources/dynmap.274/), simply download the .jar file and place it in the plugins folder using WinSCP (or use wget from the shell) and restart the minecraft server. You should see dynmap posting activity in the logs on the MineOS WebUI. If you encounter an issue, it’s likely because the jar is owned by root and not 199 (mc), use chmod/chown or WinSCP properties to fix that. By default, the dynmap will be at (H)192.168.0.190:8123, go there and make sure the page loads (if the map is all black then that’s ok). Finally add another port forwarding rule to your router to forward some high external port to this address/port so users can externally check out the map
Part 4: Backups
To setup restore points and archives of the server to automatically occur, go to the Scheduling section of the MineOS WebUI and submit two cron jobs- one as “Create a new archive” with the cron expression 0 4 * * 0, and the other as “Create a new restore point” with the cron expression 0 */12 * * *. I highly recommend you go read about cron expressions ((HS)www.npmjs.com/package/cron) to understand what these actually mean
Good luck keeping the server stable… The FreeNAS plugin was horrible for me. Often the WebUI wouldn’t work, and server was spotty and just not dependable. It got so bad I just decided to go buy a secondhand dell optiplex running debian and it’s working fantastic. Good luck the other thing you could always try if that doesn’t work is creating a debian VM on FN and install mineos that way, may be more reliable and the FN MineOS plugin isn’t updated often (as it’s not from hex).
 the other thing you could always try if that doesn’t work is creating a debian VM on FN and install mineos that way, may be more reliable and the FN MineOS plugin isn’t updated often (as it’s not from hex).