Ok so it took me a while because well frankly it’s not all that straight forward and I wanted something that was for those that come after me. What I plan on doing here is going from a fresh install to having a modpack with EXTRA MODS installed and running 
BTW… I am not a pro at Minecraft Servers and I’m sure there is WAY more that should be done to make the install more optimized but this works for me and like I said… I just wanted to get to this point. From here I will find how to do things better but I’m not there yet.
Oh I am also assuming that you are running both the server and the client (game) from the same network. If you are going out across the web and playing then you will have to do some stuff on your firewall and I’m not covering that here. I’m sure there are already some basic understandings as to what to do with that but I may make that in the future
First some housekeeping:
- I am assuming you have MineOS installed and running and can get to your web gui interface as well as your webmin interface.
- Grab some software: WinSCP, and a Launcher of your Choice
- Find some PATIENCE because you are entering a realm of IT with some of this stuff
The first thing that you will want to do is take note of your main MineOS screen (at the console… the blue screen with some IP addresses… yea that) Grab the one for your Webmin interface (Default was IP:12321) Note: you will need the : (colon) and then the port number to get to it. Put that in your web browser and go.
On this screen you will use the default username of root as the login and the password you gave when you installed MineOS and it asked you for the “ROOT” password. Note: This is the most important password in the history of your server. Don’t lose it!
What we need to do here is allow SFTP (FTP over SSH) access (how we are going to move files to and from the computer) which is turned off/denied by default.
On the top hover over “Servers” and then on the next screen “Authentication”. On here you want to find the line that says “Allow login by root?”… change that to yes and click Save at the bottom.
Now we can just ignore this for now. I will take you back a little later.
Now for this I will walk you through making 2 servers from the AT Launcher: SkyFactory and ByteSize. So what I normally do is dump the ATLauncher.exe file into a folder that I can easily find. Once you have it dumped there make a shortcut to it (the .exe) on your desktop for easy launching . Then what I normally do when I’m playing with modding modpacks etc. I will stick the mods in the root folder of ATLauncher and then I can easily copy them to where they need to go so I don’t have to hunt for them later.
Ok so on the ATLauncher the first thing you will need to do is click Packs on the right-hand side. You will be taken to a screen that has packs on the left with some buttons with each one. Find SkyFactory2 and you will want to click the New Instance button. You will then be greeted by this screen:

From here you will name it whatever you want it to be named. Click Install and you will be greeted with this window:
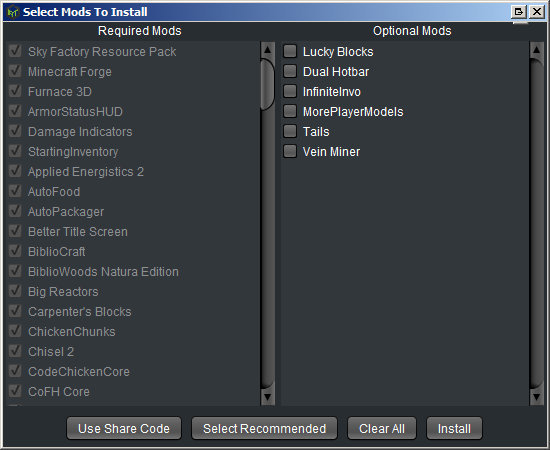
This window shows you the required mods and the optional mods. Just check which of the optional you want installed and click Install. The important thing to note here is which you selected because for the best compatibility you will need the same when you install the server as you selected here. Note: You may have a couple of pop-ups asking you to download files and that is because of distribution rights on some of the mods do not allow them to be packaged with the packs and must be downloaded separate. For those just let the file download and then close the window and you will see a window here (I can’t get it to show up now because I’ve previously downloaded them) telling you where to have the file. Just click “I’ve Downloaded This File” and it will grab it and go.
Now the client is setup for our SkyFactory Install. Go back to the Packs list and scroll down to find the ByteSize modpack and do the same thing…
On this one you will see the following window that looks similar to the last but slightly different:
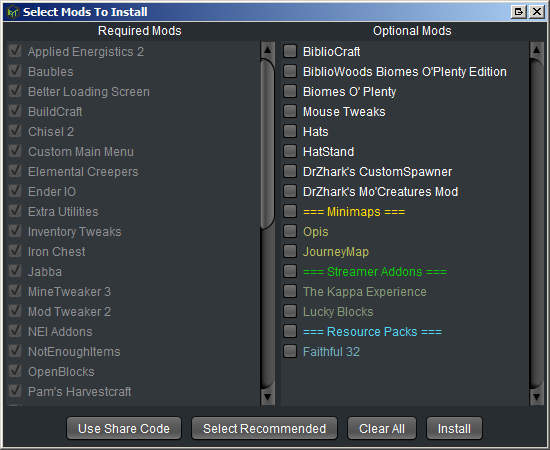
This has a couple of sections and say like in Minimaps you can select either/or Opis or JourneyMap (my fav is JourneyMap) and then they also have the ability to grab Faithful 32 which is, from what I’ve gathered THE only resource pack that really covers modded Minecraft. It’s a personal choice and I just run without a resource pack most of the time when I play this modpack. Same thing though cilck Install and really you may not have any of the other pop-up download boxes because you already downloaded the files from before.
Ok so now… what you want to do is go back to the list and do the same thing but you are going to select Create Server:
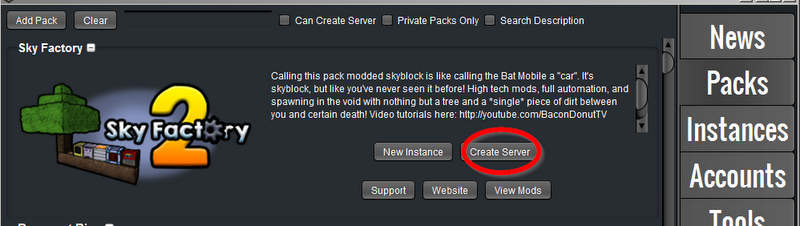
What this will do is grab all the files we need for MineOS to be happy and let us play
Do that for both of the servers and then hit up your MineOS install (should be https://ipaddress:8080) remember the colon and the port is important. You may get a warning about the certificate… just ignore that. I know that it’s tough now days with chrome to bypass that warning but it just means that it doesn’t know what certificate you are using.
Login using the username of mc and the password will be the mc password you created when you installed MineOS.
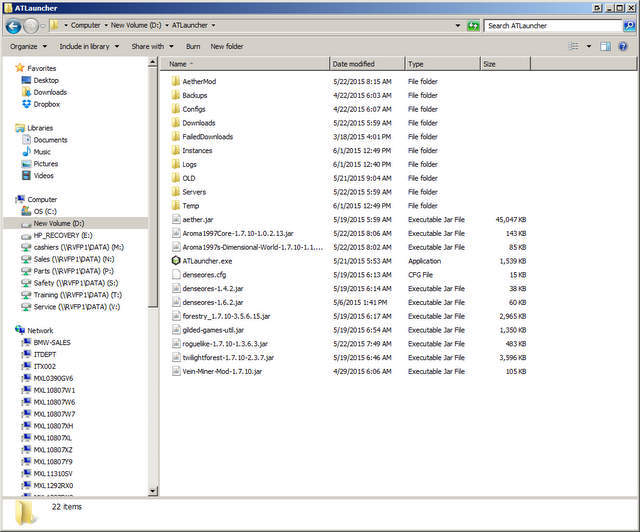
After you have logged in you will want to go to your ATLauncher folder and it will look like this without all the extra mods
You want to navigate to your Servers folder where you will have two folders in there. You will have one for SkyFactory and one for ByteSize. Now here is the tricky part. You will want to find the .jar string that actually launches the server. This is usually easy to find and in the case of SkyFactory it is:
forge-1.7.10.13.3.1395-1710ls-universal.jar
We need that information for the next part.
Now hop back into MineOS because we need to make a profile. I have created a new profile for each server I’ve installed. I’m not sure if that is good or bad but it works. So click Manage Profiles on the left side of the screen underneath Dashboard. From there you want to click the button for Create Custom Profile
You want to fill it out similar to this:
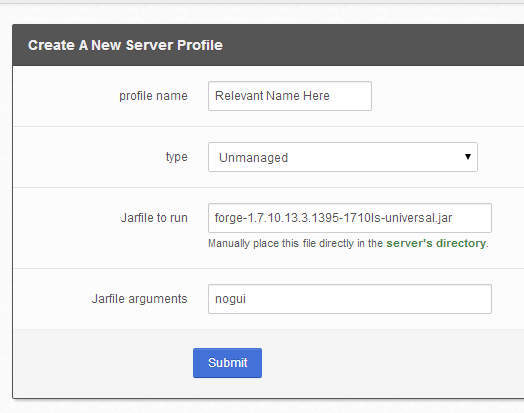
That’s it! You are done
Now we need to make the server…
Click the Create New Server tab from the left.
Name it whatever relevant name you want and leave the group membership at MC (I don’t know enough about this yet to tell anyone what to do with it)
Click Next
Now we have some meat and potatoes… Here you have the following and what you need to know for each:
- server-port - The default is 25565. LEAVE THIS ALONE! You can run multiple servers from one box and this is how you do it. If you mess with this you will need to go back into the webmin (we will do that later) and do some stuff there. If you have one server you want to run then you just don’t worry about anything at this time but as someone who is running a minecraft server… you need to know your ports.
- server-ip - Do you have multiple network cards on your server? Do you want to dedicate one of those IPs to this server? If not then just leave this alone. 0.0.0.0 means that even if you have 5 network interfaces on this server it will listen to ALL OF THEM on the port from #1 and serve that.
- max-players - I don’t know what you should put for you and your friends to play… leave it at 20 and if you need more you can come back and change it later. Also if you can’t handle 20 and need to limit… do so here.
- level-name - this is just the level of the name of the server. It is NOT what people see when they connect in. It is what you will see if you are managing the files on the server. If you put “bob” here then there will be a folder on the server named “bob” where your server specific files are located.
- level-seed - If you are here to make a Minecraft server then you know what this is for.
- difficulty - same
- gamemode - same
- level-type - IMPORTANT!!! if you are planning on running Biomes O’Plenty then we will have to change this later. Otherwise it is the same as when you make a world and you select the level type you want to have “Large Biomes, Flat, Normal”
-
Generate Structures - My personal opinion is leave this on. This is how villages spawn and for anything other than SkyFactory2 it is nice when you have things like Tinkers houses and Apiary houses etc. to cough cough borrow items from
Click Next
The next page has the following:
- profile - drop down the list and select the profile from the one we made earlier.
- java_xmx - This is how much of your server’s memory this instance of Minecraft can use. Not how much it WILL use but how much it CAN. I have 8GB on my server and I have set this number to 4096 (4GB). There are many different discussions on this already out there. Just don’t set it too high. You can always come back and change it.
- java_xms - This is how much of your memory above (cannot be set higher for obvious reasons) your server is going to grab initially and keep even if it is actively using it or not. …err I should say “if it NEEDS it or not”. The more you put here the better performance you SHOULD see because the server will buffer more which should make for smoother gameplay. All bets are off once you have more than one or two people on your server though so you may need to come back and change this later.
- java_tweaks - I don’t know what this is. I’m sure this is where I can find optimizations here but I’m clueless so oh well.
- Archive Interval - Oh boy oh boy… this is how often it will “backup” your WHOLE SERVER (at least that’s my understanding.) If you don’t have a ton of HDD space you will need to set this to a wider frame of time. You can always change it and you can always manually delete files if you need more space.
- Backup Interval - This is your WORLD backup. I suggest you set it according to your play style. If you play all day long then backup every so often. If you play once a week or once a day for a few hours then well set it accordingly. You can (and should) always create a manual backup before play sessions given that you can access your MineOS web interface.
- Start Server on Boot - if the server reboots for security updates or if you lose power. …or if you just reboot the server. When this is OFF you will need to manually start the server. This is helpful if you are having issues somewhere and want to try to troubleshoot and watch it boot etc.
Click Submit …AND THEN DO NOTHING ELSE …not yet anyway
Ok so we have our server shell… now let’s put our files in it. Use WinSCP to SFTP into your server. To do that use the default settings in WinSCP and use your root login. On the left side you will want to navigate to your ATLauncher folder and then to your Servers folder followed by your SkyFactory2 server’s folder. On the right side you want to navigate to: /var/games/minecraft/servers
It should look a little something like this:
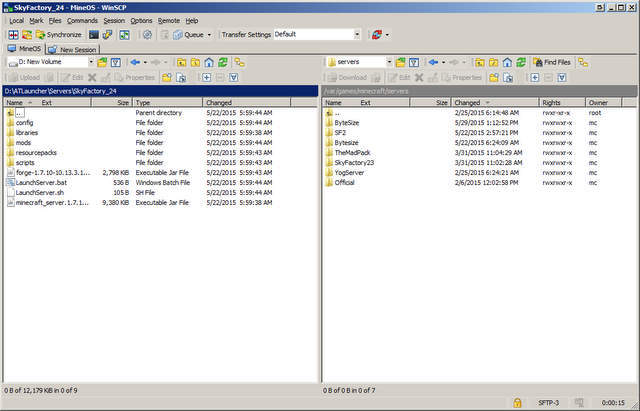
On the right side you should see only your folder listed. Open that and then drag all the contents from the left side over to the right side.
now… one more thing before we get out of here… go back one level to where you see the folder with your server name listed… right-click on that and choose properties.
You will want to do this:
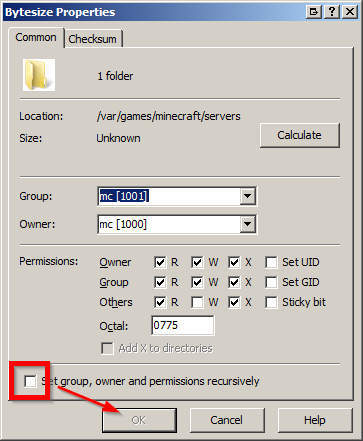
What this does is set the permissions to be owned by mc because right now root uploaded them and they need to have permissions for mc to be able to be launched by MineOS. Once that is done you can close WinSCP (hopefully you saved the connection data because we will be back later for the 2nd server).
Now go to your Dashboard in MineOS and you will see your server listed… Click on the server name. After you have clicked that you will need to click server.properties from the left-hand side. All the way towards the bottom (2nd from the bottom if you are counting) you will see the level-type I talked about earlier… yea with SkyFactory2 it’s not a big deal but if you are using Biomes O’Plenty then you need to type here:
BIOMESOP
Just like that (not in italics obviously)
Also you will see lots more options then you originally saw. You can fiddle with them but mostly just leave it alone unless you know what you are doing. If you want to test later then by all means do… just backup your world and Archive the thing in case you mess something up.
Ok now click on Server Status and yup… click START.
Give it a while… you can refresh the page or click back on server-status if you want to but your server will fail to start. If you click on the “Console” you will see that you have to accept the EULA. Go back to the Server Status page and there will be a blue button at the top that says “Accept EULA”. The message should go away and you can then finally and officially START YOUR SERVER.
Give it a few minutes to generate whatever it needs to do and then launch SkyFactory2 from your ATLauncher in the Instances tab. Hit up multiplayer and connect using the IP. I do not know why but it never detects games on my local network. I just do a direct connect and go. It will save it for next time.
If you are good with that then you are free to go. If you want to setup a 2nd server and add more mods to it then keep reading friend
Ok so like I said when I do this I create a profile for each server and that is in case one has a different .jar that needs to execute (filename) and it is kind of nice to see what is working with what but go ahead and do everything you did for SkyFactory2 here for ByteSize… just don’t start it yet.
Ok so you should be ready to rock with your profile created, server created, and then files uploaded right… ok now some fun stuff…
You need to go into the server.properties tab for your ByteSize server. on there you will need to change the following settings:
level-type: BIOMESOP
server-port: xxxxxx
For server port I left it blank because there are oh some 64 thousand or so ports you can use but in reality just set it to ONE HIGHER so: 25566
It doesn’t have to be that… but unless you want to look on the internet for standard ports and find one that has nothing associated… just do it.
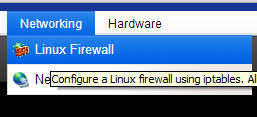
Once you have done that you need to do one more thing so go back into the Webmin (serverip:12321, login is root and your pass… well you should know that) and you need to go here: Networking --> Linux Firewall
Now there is TONS here so I am going to list out what you need to do. You can play with it later but for now just read and follow along:
- Click New Rule on the top section:
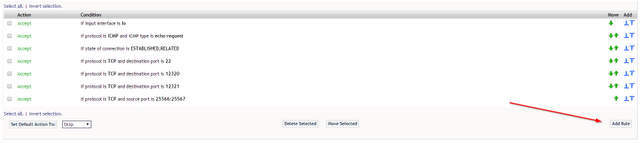
- Under “Chain and Chain Action Details” you need to do the following:
Rule Comment - Make a note here as to which server it relates to
Action to Take - ACCEPT - Under “Condition Details” you need the following:
Source TCP or UDP port: Equals “Port(s): 25566” <-- or whatever port you set in your server.properties - CLICK SAVE
For me this has restarted the firewall service and I could connect right away but if not then the easiest thing to do is to just reboot the server. If you can’t do that then you have to google how to restart Ubuntu firewall command line. I just am not that good with Linux and I don’t mind a reboot.
Once you are done with that you can click start, wait, accept EULA, and then click start again and you have now 2 servers up and running.
Now that you have that let’s say you wanted to add mods to your server…
- Download your mods to your ATLauncher folder like you saw in my image above that I did. No you don’t have to put them here but it makes life more simple.
- Stop your server - MineOS, Click on Server Name, Click Stop
- WinSCP into your server and navigate back to your server you want to add mods to. In that folder you will see a mods folder. Put your ATLauncher folder in the left side and drag the mods over to the mods folder.
- Be mindful of mods that have .cfg files. Those files (like denseores.cfg in my image above) need to go into the folder named config.
- You are done on the server side. You can start your server back up and just watch it for a few minutes (you should know how long it takes to get up and running by now) and make sure there are no errors. If there are you will need to troubleshoot them.
Now the client side. Remember I told you that you have to match mods… well let’s do it. here is the great thing with ATLauncher that I’ve found… you can “CLONE” your instance. So you don’t have to change anything you had before (e.g. any single player worlds you want to keep the same) and you can test things etc. It’s great!
So in ATLauncher go to Instances Tab
- Find your instance you wish to clone
- Click clone
- Name it whatever you want and click OK
- Once done locate the clone and click Edit Mods
- It looks similar to the original screen when you installed the instance. From here you can click on mods and disable/enable them at will. Note: You may break your game by doing things like that.
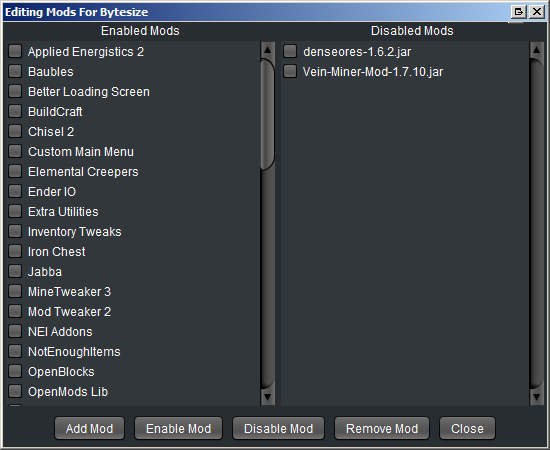
- For each mod you added on the server click Add Mod and navigate to your ATLauncher folder and add that mod in. when you "add them you will see it listed on the right side like you see “denseores” and “veinminer” in the screenshot.
- You only then need to check each one and enable them
Note: If you have any with .cfg files (like denseores) you will need to go into the folder and copy the .cfg file into the config folder for your instance. It is located in your ATLauncher folder under Instances and then whatever you named your clone instance.
Also note: If you have a mod that has multiple requirements. For example if you want to run Aether2 you need to have the Aether2 mod and the “guilded-games-util.jar” mod as well to run it. Check the requirements of the mods you wish to add. Most of the time I have found that if I add something wrong it will let me know
After you have added and enabled the mods just close that window and click Play
I hope you have enjoyed this. If you couldn’t tell it’s my first time and I tend to get detailed where it may not be needed. Also my screenshots may not be great but I was having issues and I always do when I have screenshots because I want to screenshot all the things! and share them but that would make this 10 times longer!
Thanks,
noviceuser
